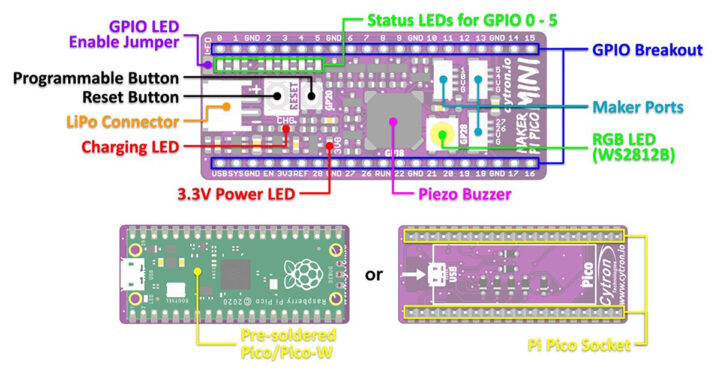
Maker Pi Pico Mini ของ Cytron มาพร้อมกับหน่วยประมวลผลบอร์ด Raspberry Pi Pico / Raspberry Pi Pico W มีความสามารถเหมือนกับบอร์ดรุ่นพี่ Maker Pi Pico อย่างไฟ LED แสดงสถานะการทำงานของ GPIO, WS2812B Neopixel RGB LED, passive piezo buzzer, ปุ่มกดที่สามารถโปรแกรมการทำงานได้และปุ่ม reset ตัวบอร์ด
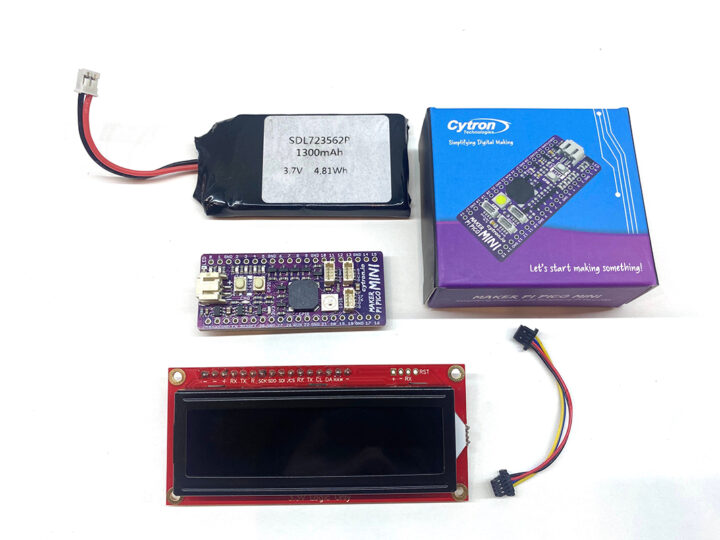
ฉันต้องขอขอบคุณ บริษัท Cytron ที่ส่งบอร์ด Maker Pi Pico Mini ที่มาพร้อมจอ LCD RGB และ แบตเตอรี่ Lithium Polymer 3.7V ในบทความนี้เราแสดงสภาพภูมิอากาศจากทั่วโลกกับบอร์ด Maker Pi Pico โดยเราจะเขียนด้วยภาษา C/C++ (Arduino IDE) ก่อนอื่นเราจะมาแนะนำอุปกรณ์กันก่อนนะครับ
บอร์ด Maker Pi Pico Mini
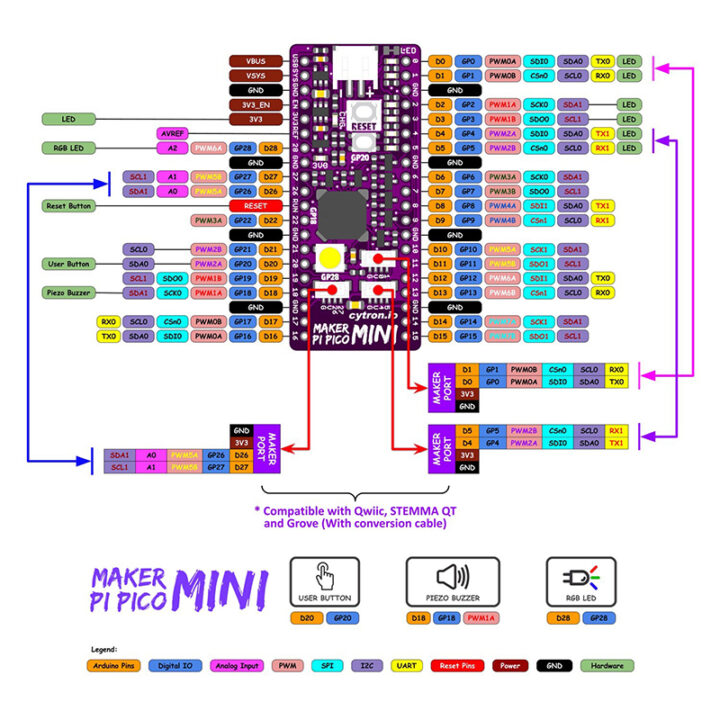
Raspberry Pi Pico Mini เป็นเวอร์ชั่นใหม่ที่สามารถเชื่อมต่อเครือข่ายไร้สายได้ โดยมีการบัดกรีเพิ่มวงจรให้ใช้งานได้ง่ายมากขึ้น โดยมีไฟ RGB 1 ดวง มี Button Switch จำนวน 1 มี ลำโพ Buzzer จำนวน 1 ตัว และมี Maker Port (JST-SH-4 way connector) จำนวน 3 พอร์ต ติดตั้งอยู่บนตัวบอร์ด Maker Pi Pico Mini โดยตัว Maker Port รองรับการใช้งานร่วมกับโมดูล Sparkfun’s Qwiic และโมดูล Adafruit’s STEMMA QT โดยทั้ง Qwiic และ STEMMA QT มีการใช้งานรูปแบบการสื่อสารแบบ I2C ซึ่งสามารถทำการเชื่อมต่อร่วมกับแบบ daisy-chained ได้ และนอกเหนือจากการสื่อสารรูปแบบ I2C แล้ว Maker Port ยังรองรับการสื่อสารรูปแบบ UART, Analog Input และ Digital Input/Output ด้วย
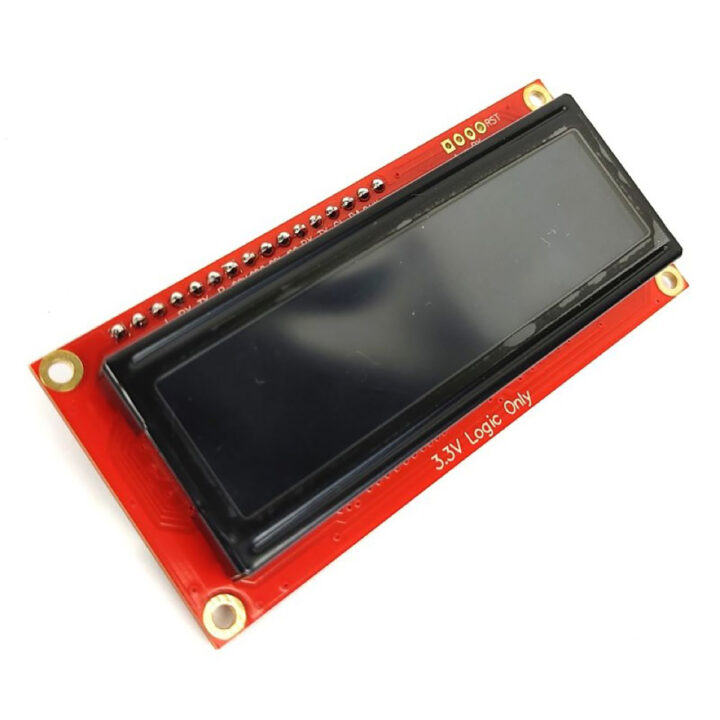
หน้าจอแสดงผล SparkFun SerLcd
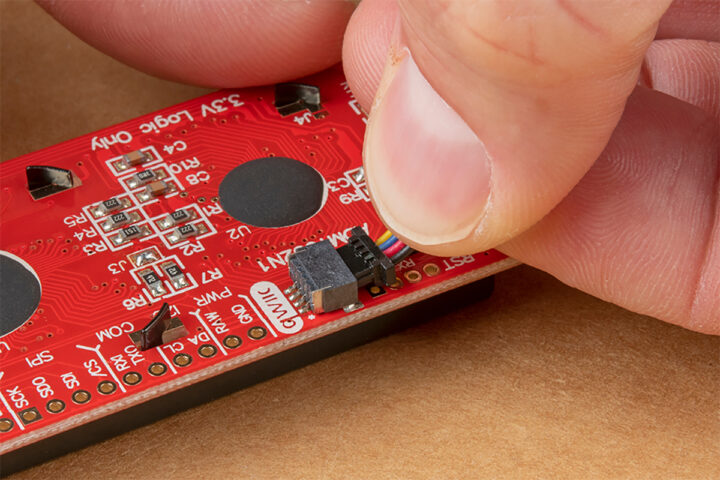
SparkFun SerLCD เป็นจอ LCD ที่ใช้ชิฟประมวลผล ATmega328P ควบคุมหน้าจอทั้งหมด โดยเปิดการทำงานรอรับคำสั่งสื่อสารกับพอร์ตอนุกรมซึ่งสามารถใช้งานได้ง่าย มาพร้อม I2C Interface โดยมีขนาด 16 ตัวอักษร 2 แถว หน้าจอแบบ RGB สามารถเปลี่ยนสีได้ตามต้องการ จอแสดงผลนี้สามารถสื่อสารได้ 3 วิธีคือ I2C, SPI, Qwiic
Qwiic สามารถเชื่อมต่อทั้งสายไฟและสายสื่อสาร I2C ได้เพียงชุดเดียว ซึ่งจะสะดวกมากๆถ้าใช้กับ Maker Port ของ Maker Pi Pico Mini
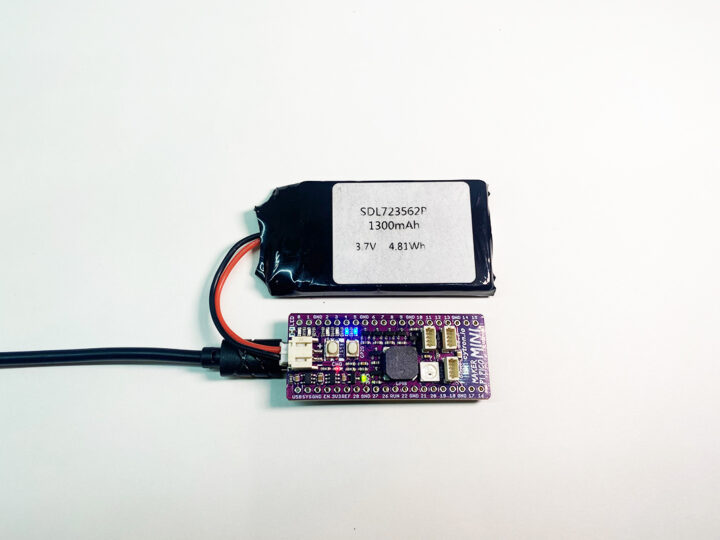
 แบตเตอรี่
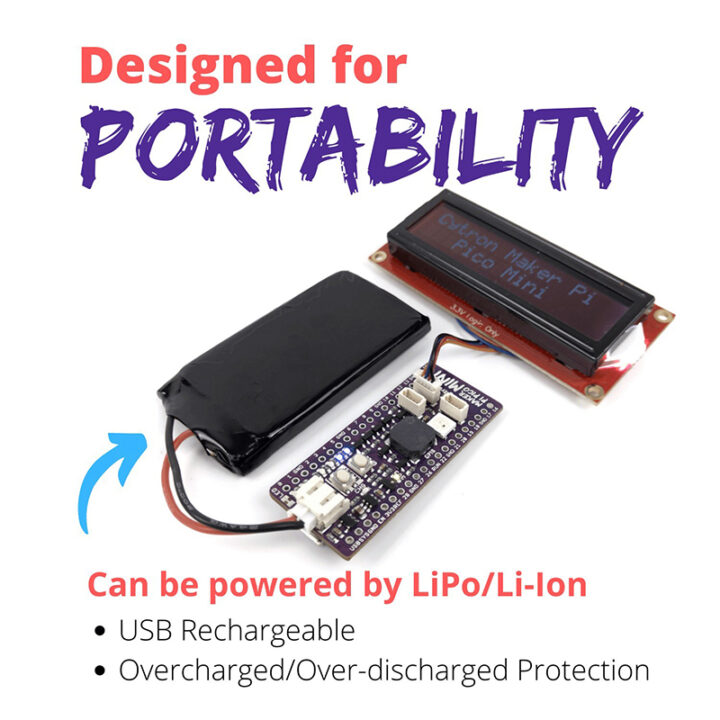
แบตเตอรี่ เป็นชนิด Lithium Polymer แรงดันไฟฟ้า 3.7 โวลล์ กระแสไฟฟ้า 1300 มิลลิแอมป์ เมื่อใช้กับบอร์ด Maker Pi Pico MINI สามารถเสียบกับช่อง JST. ได้เลยอีกทั้งยังสามารถชาร์จ แบตเตอรี่ได้ด้วยการเสียบสาย USB ที่บอร์ดที่แรงดันไฟฟ้า 5V ก็สามารถชาร์จแบตเตอรี่ได้โดยตรงทำให้ใช้งานได้ง่ายขึ้น
ติดตั้งบอร์ด Raspberry Pi Pico ใน Arduino IDE
ก่อนอื่นจะต้องติดตั้ง Arduino IDE ก่อนนะครับ ซึ่งจะไม่พูดถึงในบทความนี้นะครับ หลังจากที่ติดตั้ง Arduino IDE เรียบร้อยแล้ว
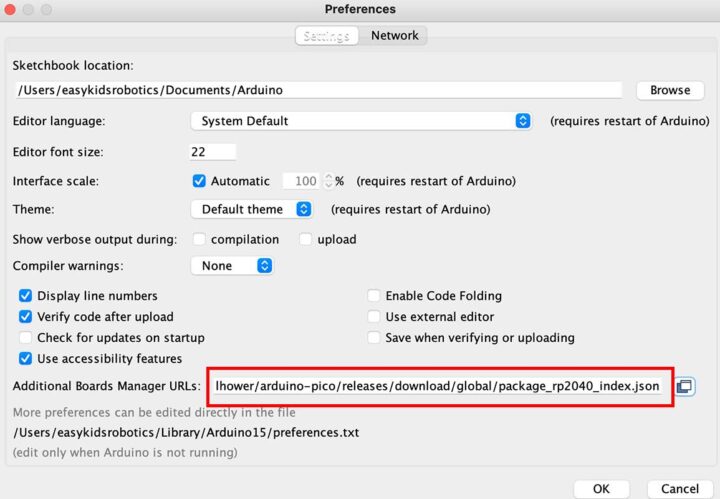
(Windows OS) เข้าไปที่ File >>> Preferences ตามภาพครับ
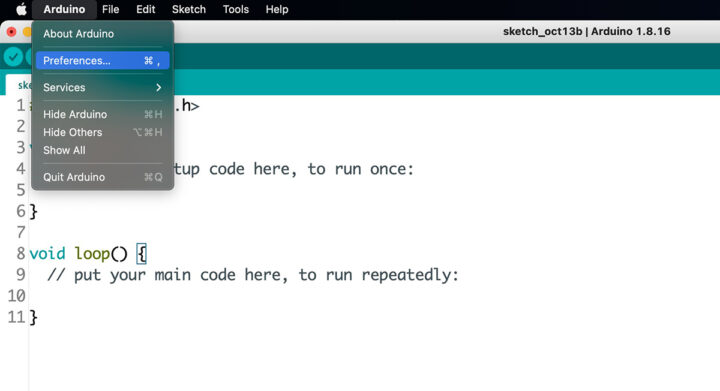
(Mac OS) เข้าไปที่ Arduino >>> Preferences ตามภาพครับ
ให้ใส่ลิ้ง URL ของการติดตั้ง Raspberry Pi Pico ลงไปในช่องสีแดงตามภาพครับ
ลิ้ง >>>> https://github.com/earlephilhower/arduino-pico/releases/download/global/package_rp2040_index.json
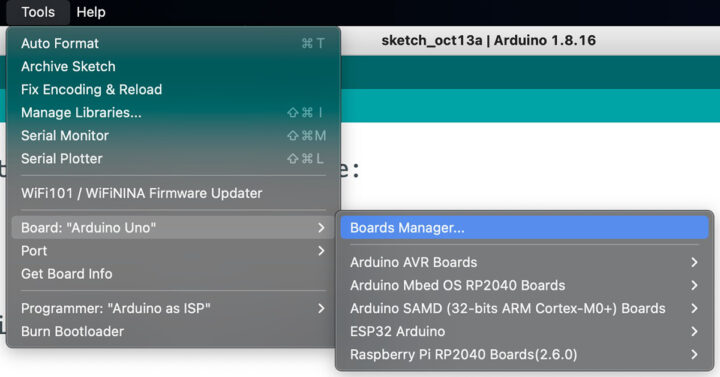
จากนั้นให้เราเข้าไปที่ Tools >>> Board >>> Boards Manager ตามภาพครับ
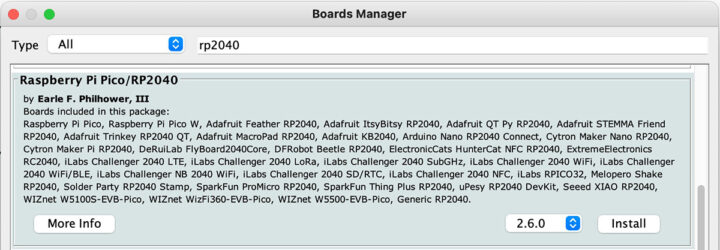
จากนั้นจะมีหน้าต่าง Boards Manager ขึ้นมาให้ใส่คำว่า rp2040 ครับ จากนั้นให้กด Install ได้เลย เพียงเท่านี้ก็เป็นการติดตั้งเสร็จเรียบร้อยครับ
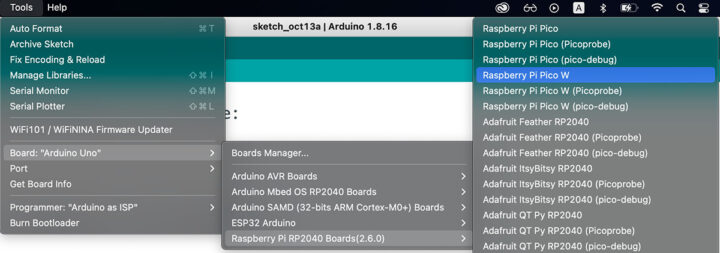
จากนั้นให้เราไปที่ Tools >>> Board >>>กดเลือก Raspberry Pi RP2040 Boards ให้เลือกบอร์ด Raspberry Pi Pico W ครับ
ส่วนให้การ Upload จะขออนุญาตข้ามไปนะครับ หลังจากเสียบสาย USB ให้เข้าไปเลือก Port ที่เชื่อมต่อกับ USB ก่อนนะครับ จากนั้นก็กดปุ่ม Upload ได้เลยครับ
ติดตั้ง Library SparkFun SerLCD ครับ
ก่อนอื่นเลยเราจะต้องติดตั้ง Library หรือชุดคำสั่งของหน้าจอ LCD กันก่อนนะครับ
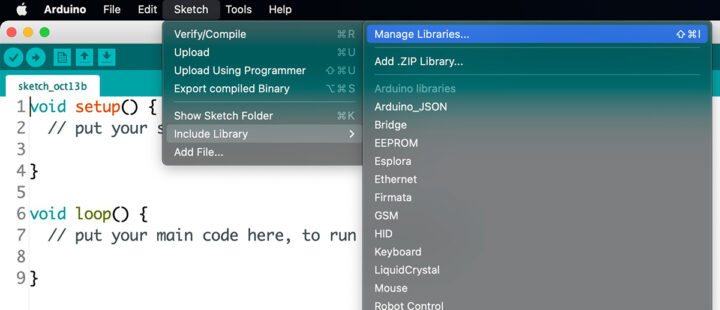
โดยเข้าไปที่ Sketch >>> Include Library >>>กดเลือก Manage Libraries ตามภาพครับ
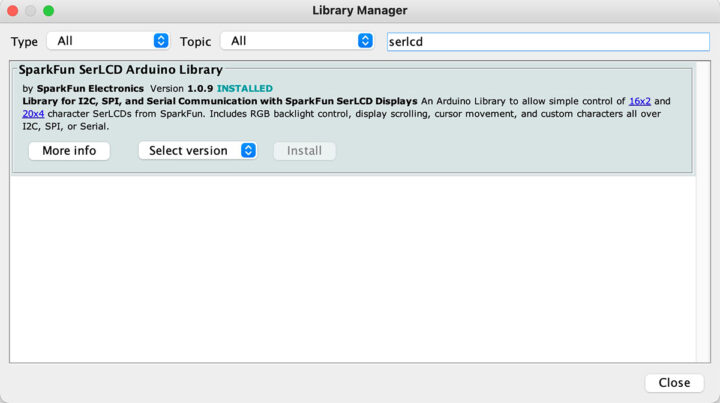
จากนั้นจะมีหน้าต่าง Library Manager ขึ้นมาให้เราพิมพ์ serlcd ใส่ในช่องตามภาพ และกดปุ่ม Install ได้เลยครับ
ต่อไปเราจะเพิ่ม Library ของ SparkFun SerLCD เข้ามาครับ
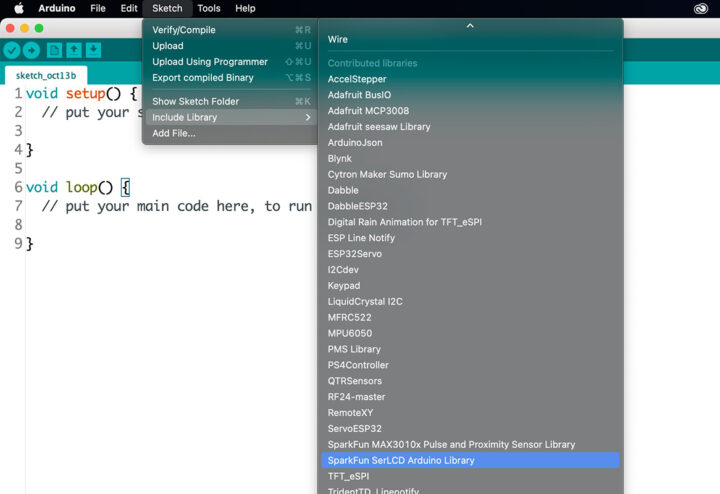
โดยไปที่ Sketch >>> Include Library >>>กดเลือก SparkFun SerLCD Arduino Library ครับ
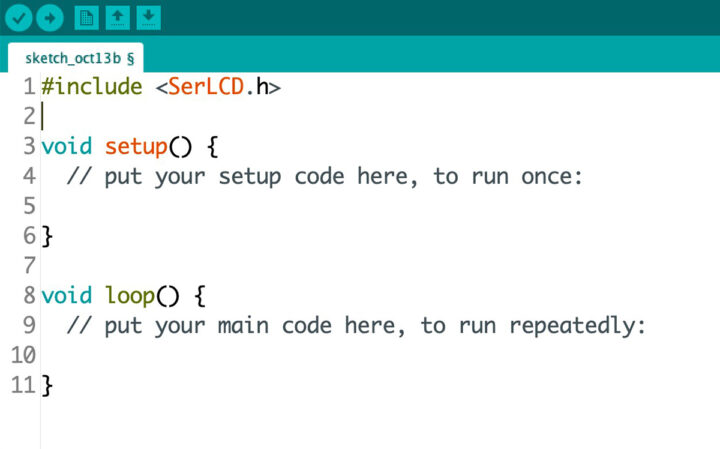
เราจะเห็นได้ว่า Library SerLCD ได้ถูกเรียกพร้อมใช้งานในโค้ดของเราแล้ว
ทดสอบการเปลี่ยนสี Backlight และตัวอักษรของหน้าจอ SerLCD
การทดสอบจะเป็นการเปลี่ยนสี Backlight ไปพร้อมกับไฟ RGB (โดยสามารถเพิ่ม Library NeoPixel เหมือนกับตัวอย่างด้านบน) เปลี่ยนสีไปเรื่อยๆจำนวน 10 สี ทุกๆ 3 วินาที ครับ
โค้ดตัวอย่างการเปลี่ยนการเปลี่ยนสี Backlight และตัวอักษรของหน้าจอ SerLCD
|
1 2 3 4 5 6 7 8 9 10 11 12 13 14 15 16 17 18 19 20 21 22 23 24 25 26 27 28 29 30 31 32 33 34 35 36 37 38 39 40 41 42 43 44 45 46 47 48 49 50 51 52 53 54 55 56 57 58 59 60 61 62 63 64 65 66 67 68 69 70 71 72 73 74 75 76 77 78 79 80 81 82 83 84 85 86 87 88 89 |
#include <Wire.h> #include <SerLCD.h> //Click here to get the library: http://librarymanager/All#SparkFun_SerLCD #include <Adafruit_NeoPixel.h> #define LED_PIN 28 #define LED_COUNT 1 Adafruit_NeoPixel strip(LED_COUNT, LED_PIN, NEO_GRB + NEO_KHZ800); SerLCD lcd; // Initialize the library with default I2C address 0x72 void setup() { Wire.begin(); strip.begin(); strip.show(); strip.setBrightness(50); //ปรับความสว่างของไฟ RGB 0-255 lcd.begin(Wire); //By default .begin() will set I2C SCL to Standard Speed mode of 100kHz Wire.setClock(400000); //Optional - set I2C SCL to High Speed Mode of 400kHz } void loop() { lcd.setBacklight(0, 0, 0); //black is off lcd.clear(); //Clear the display - this moves the cursor to home position as well lcd.print("Black (off)"); strip.setPixelColor(0, strip.Color(0, 0, 0)); strip.show(); delay(3000); lcd.setBacklight(255, 0, 0); //red lcd.clear(); lcd.print("Red"); strip.setPixelColor(0, strip.Color(255, 0, 0)); strip.show(); delay(3000); lcd.setBacklight(0xFF8C00); //orange lcd.clear(); lcd.print("Orange"); strip.setPixelColor(0, strip.Color(255,127,0)); strip.show(); delay(3000); lcd.setBacklight(255, 255, 0); //yellow lcd.clear(); lcd.print("Yellow"); strip.setPixelColor(0, strip.Color(0, 255, 0)); strip.show(); delay(3000); lcd.setBacklight(0, 255, 0); //green lcd.clear(); lcd.print("Green"); strip.setPixelColor(0, strip.Color(0, 255, 0)); strip.show(); delay(3000); lcd.setBacklight(0, 0, 255); //blue lcd.clear(); lcd.print("Blue"); strip.setPixelColor(0, strip.Color(0, 0, 255)); strip.show(); delay(3000); lcd.setBacklight(0x4B0082); //indigo, a kind of dark purplish blue lcd.clear(); lcd.print("Indigo"); strip.setPixelColor(0, strip.Color(75,0,130)); strip.show(); delay(3000); lcd.setBacklight(0xA020F0); //violet lcd.clear(); lcd.print("Violet"); strip.setPixelColor(0, strip.Color(127,0,255)); strip.show(); delay(3000); lcd.setBacklight(0x808080); //grey lcd.clear(); lcd.print("Grey"); strip.setPixelColor(0, strip.Color(197, 197, 204)); strip.show(); delay(3000); lcd.setBacklight(255, 255, 255); //white lcd.clear(); lcd.print("White"); strip.setPixelColor(0, strip.Color(255, 255, 255)); strip.show(); delay(3000); } |
วิดีโอตัวอย่างการเปลี่ยนสี Backlight และตัวอักษรของหน้าจอ SerLCD
ทำให้ Maker Raspberry Pi Pico Mini เชื่อมต่อ Internet ผ่าน WiFi และแสดงผลออกหน้าจอ SerLCD กันครับ
การเชื่อมต่อ WiFi ผมจะแสดงข้อความบอกสถานะหากยังไม่เชื่อมต่อ WiFi สถานะไฟ Backlight เป็นสีแดง พร้อมด้วยไฟ RGB วิ่งเป็น RainBow และ เมื่อเชื่อมต่อสำเร็จแล้วให้แสดง IP Address และเปลี่ยนสถานะไฟ Backlight เป็นสีเขียว
โค้ดตัวอย่างในการเชื่อมต่อ Internet ผ่าน WiFi แสดงผลผ่านจอ SerLCD ครับ
|
1 2 3 4 5 6 7 8 9 10 11 12 13 14 15 16 17 18 19 20 21 22 23 24 25 26 27 28 29 30 31 32 33 34 35 36 37 38 39 40 41 42 43 44 45 46 47 48 49 50 51 52 53 54 55 56 57 58 59 |
#include <WiFi.h> #include <SerLCD.h> #include <Wire.h> #include <Adafruit_NeoPixel.h> #define LED_PIN 28 #define LED_COUNT 1 Adafruit_NeoPixel strip(LED_COUNT, LED_PIN, NEO_GRB + NEO_KHZ800); SerLCD lcd; const char* ssid = "xxxxxxxxxx"; // ชื่อ WiFi const char* password = "xxxxx"; // รหัส Wifi void setup() { Serial.begin(115200); strip.begin(); strip.setBrightness(50); //ปรับความสว่างของไฟ RGB 0-255 WiFi.mode(WIFI_STA); WiFi.begin(ssid, password); Wire.begin(); Wire.setClock(400000); Serial.println("Connecting to WIFI..."); lcd.begin(Wire); //Set up the LCD for I2C communication lcd.clear(); lcd.setContrast(5); //Set contrast. Lower to 0 for higher contrast. lcd.clear(); //Clear the display - this moves the cursor to home position as well lcd.setBacklight(255, 0, 0); lcd.clear(); while (WiFi.status() != WL_CONNECTED) { Serial.print("."); lcd.setCursor(1, 0); lcd.print(":WiFi Status:"); lcd.setCursor(2, 1); lcd.print("Not Connect"); rainbow(10); } strip.setPixelColor(0, strip.Color(0, 255, 0)); strip.show(); Serial.println(""); Serial.print("IP Address: "); Serial.println(WiFi.localIP()); lcd.setBacklight(0, 255, 0); lcd.clear(); lcd.setCursor(2, 0); lcd.print("WiFi Connect"); lcd.setCursor(1, 1); lcd.print("IP:"); lcd.setCursor(4, 1); lcd.print(WiFi.localIP()); } void loop() { } void rainbow(int wait) { for (long firstPixelHue = 0; firstPixelHue < 5 * 65536; firstPixelHue += 256) { strip.rainbow(firstPixelHue); strip.show(); // Update strip with new contents delay(wait); // Pause for a moment } } |
วิดีโอตัวอย่างการเชื่อมต่อ Internet ผ่าน WiFi
การรับค่าสภาพอากาศจาก openweathermap.org ด้วย HTTP GET
ในการทดลองนี้ เราจะใช้ HTTP GET เพื่อดึงข้อมูลสภาพอากาศผ่าน API ของ openweathermap.org ซึ่งเปิดให้ดึง API สภาพอากาศได้ฟรีแต่ก็จะมีการจำกัดจำนวน Request ไว้ ซึ่งสามารถอ่านเพิ่มเติมในหน้าเว็บไซต์ได้เลย แต่สำหรับแพ็คเกจฟรีนั้น ก็ถือว่าเพียงพอครับ
OpenWeatherMap เป็นเว็บให้ข้อมูลสภาพอากาศ ข้อมูลการพยากรณ์อากาศทั่วโลก ข้อมูลสภาพอากาศย้อนหลัง แผนที่อากาศ ฯลฯ การใช้ง่ายมากๆ เพียงแค่ใส่ชื่อเมืองและประเทศลงไปเท่านั้นก็ได้ข้อมูลสภาพอากาศมาแล้ว นอกจากจะให้ข้อมูลสภาพอากาศ
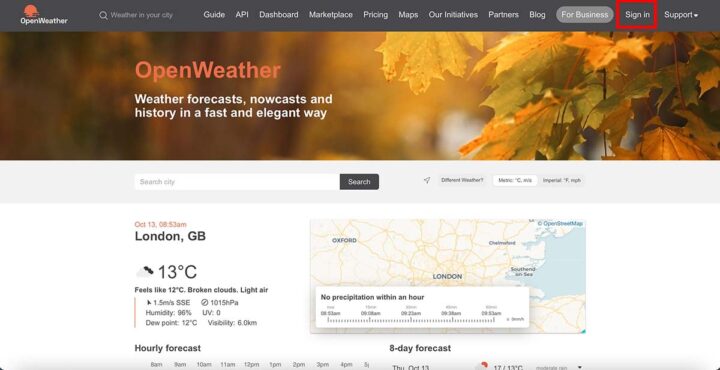
ขั้นตอนแรกเรามาสมัครสมาชิกกันก่อนครับ โดยกดไปที่ Sign In
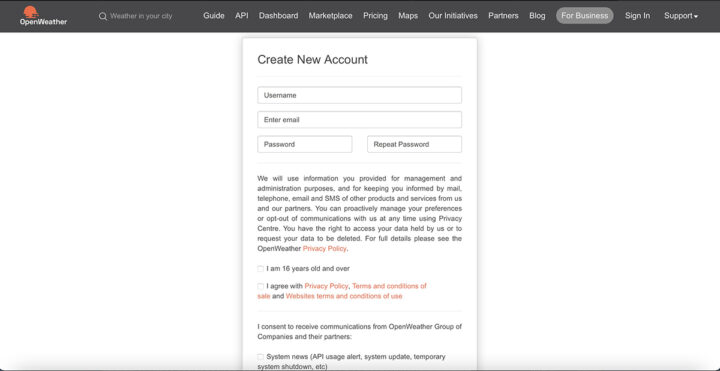
จากนั้นกดไปที่ Create an Account ครับ
กรอกข้อมูล Username, Email, Password, และกดยินยอมต่างๆ ครับ
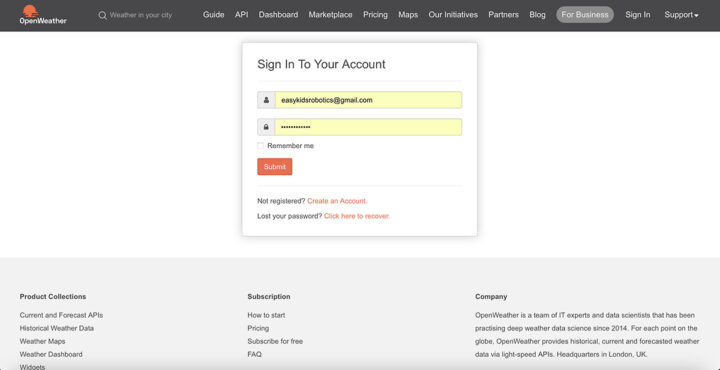
จากนั้นเข้าสู่ระบบที่เราได้ Register ไว้ครับ
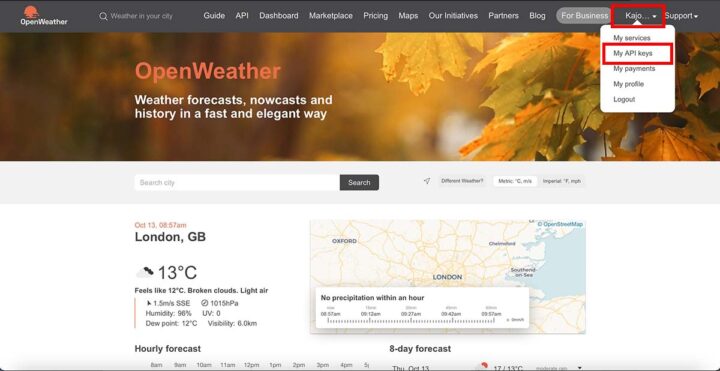
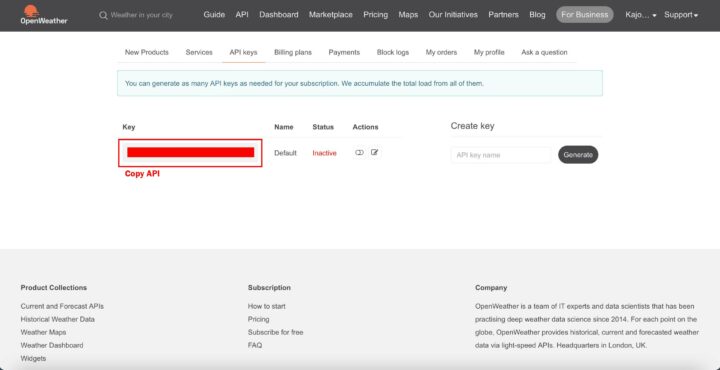
หลังจากนั้นจะมีชื่อของเราเมื่อเข้าสู่ระบบเรียบร้อยแล้วให้คลิ๊กที่ชื่อของเรา และให้กดไปที่ My API keys ครับ
เราจะได้ Key API ของเราให้เรา Copy เก็บไว้ครับ
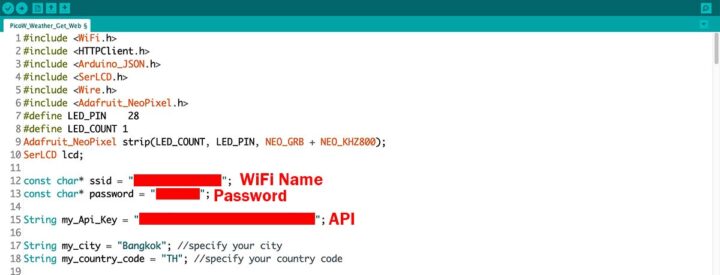
ต่อไปจะทดสอบการแสดงสภาพอากาศจาก openweathermap จาก Key API ที่เราได้มาใส่ในโค้ดครับ
ตัวอย่างแสดงสภาพอากาศโดยผมใส่เมืองคือ My_city = “BangKok”, my_country_code = “TH”
ซึ่งสามารถเปลี่ยนได้จากเมืองใหญ่ๆทั่วโลกครับ เช่น หากจะให้แสดงสภาพอากาศของประเทศอังกฤษ เมือง London ก็ใส่ตรง My_city = “London” ,my_country_code = “GB” ครับ
|
1 2 3 4 5 6 7 8 9 10 11 12 13 14 15 16 17 18 19 20 21 22 23 24 25 26 27 28 29 30 31 32 33 34 35 36 37 38 39 40 41 42 43 44 45 46 47 48 49 50 51 52 53 54 55 56 57 58 59 60 61 62 63 64 65 66 67 68 69 70 71 72 73 74 75 76 77 78 79 80 81 82 83 84 85 86 87 88 89 90 91 92 93 94 95 96 97 98 99 100 101 102 103 104 105 106 107 108 109 110 111 112 113 114 115 116 117 118 119 120 121 122 123 124 125 126 127 128 129 130 |
#include <WiFi.h> #include <HTTPClient.h> #include <Arduino_JSON.h> #include <SerLCD.h> #include <Wire.h> #include <Adafruit_NeoPixel.h> #define LED_PIN 28 #define LED_COUNT 1 Adafruit_NeoPixel strip(LED_COUNT, LED_PIN, NEO_GRB + NEO_KHZ800); SerLCD lcd; const char* ssid = "xxxxxxxxxxx"; const char* password = "xxxxxxxx"; String my_Api_Key = "xxxxxxxxxxxxxxxxx"; String my_city = "Bangkok"; //specify your city String my_country_code = "TH"; //specify your country code unsigned long last_time = 0; unsigned long timer_delay = 10000; String json_array; void setup() { Serial.begin(115200); strip.begin(); strip.show(); strip.setBrightness(50); WiFi.mode(WIFI_STA); WiFi.begin(ssid, password); Wire.begin(); Wire.setClock(400000); Serial.println("Connecting to WIFI..."); lcd.begin(Wire); //Set up the LCD for I2C communication lcd.clear(); lcd.setContrast(5); //Set contrast. Lower to 0 for higher contrast. lcd.clear(); //Clear the display - this moves the cursor to home position as well lcd.setBacklight(255, 0, 0); lcd.clear(); while (WiFi.status() != WL_CONNECTED) { Serial.print("."); lcd.setCursor(1, 0); lcd.print(":WiFi Status:"); lcd.setCursor(2, 1); lcd.print("Not Connect"); rainbow(10); } strip.setPixelColor(0, strip.Color(0, 255, 0)); strip.show(); Serial.println(""); Serial.print("IP Address: "); Serial.println(WiFi.localIP()); lcd.setBacklight(0, 255, 0); lcd.clear(); lcd.setCursor(2, 0); lcd.print("WiFi Connect"); lcd.setCursor(1, 1); lcd.print("IP:"); lcd.setCursor(4, 1); lcd.print(WiFi.localIP()); Serial.println("First set of readings will appear after 10 seconds"); delay(3000); } void loop() { if ((millis() - last_time) > timer_delay) { if (WiFi.status() == WL_CONNECTED) { String server = "http://api.openweathermap.org/data/2.5/weather?q=" + my_city + "," + my_country_code + "&APPID=" + my_Api_Key + "&units=metric"; lcd.clear(); lcd.setBacklight(255, 255, 255); json_array = GET_Request(server.c_str()); Serial.println(json_array); JSONVar my_obj = JSON.parse(json_array); if (JSON.typeof(my_obj) == "undefined") { Serial.println("Parsing input failed!"); return; } Serial.print("JSON object = "); Serial.println(my_obj); Serial.print("Temperature: "); Serial.println(my_obj["main"]["temp"]); Serial.print("Pressure: "); Serial.println(my_obj["main"]["pressure"]); Serial.print("Humidity: "); Serial.println(my_obj["main"]["humidity"]); Serial.print("Wind Speed: "); Serial.println(my_obj["wind"]["speed"]); lcd.setCursor(0, 0); lcd.print("WEATHER: BANGKOK"); lcd.setCursor(1, 1); lcd.print("T="); lcd.print(my_obj["main"]["temp"]); lcd.setCursor(7, 1); lcd.print((char)223); lcd.print("C"); lcd.setCursor(10, 1); lcd.print("H="); lcd.print(my_obj["main"]["humidity"]); lcd.print("%"); } else { Serial.println("WiFi Disconnected"); } last_time = millis(); } } String GET_Request(const char* server) { HTTPClient http; http.begin(server); int httpResponseCode = http.GET(); String payload = "{}"; if (httpResponseCode > 0) { Serial.print("HTTP Response code: "); Serial.println(httpResponseCode); payload = http.getString(); } else { Serial.print("Error code: "); Serial.println(httpResponseCode); } http.end(); return payload; } void rainbow(int wait) { for (long firstPixelHue = 0; firstPixelHue < 5 * 65536; firstPixelHue += 256) { strip.rainbow(firstPixelHue); strip.show(); // Update strip with new contents delay(wait); // Pause for a moment } } |
วิดีโอการทำงานครับ
เพียงเท่านี้เราก็สามารถแสดงสภาพอากาศได้จากทั่วโลกด้วยบอร์ด Maker Pi Pico Mini ใช้งานร่วมกับจอ SerLCD จาก SparkFun พร้อมทั้งยังสามารถใช้ไฟเลี้ยงจากแบตเตอรี่ได้อีกด้วย สามารถพกพาไปได้ทุกที่ขอเพียงมีแค่สัญญาณ Internet ก็พอ
บอร์ด Maker Pi Pico Mini ที่มาพร้อมจอ LCD RGB และ แบตเตอรี่ Lithium Polymer 3.7V มีจำหน่ายแล้วที่ร้านค้าออนไลน์ Cytron ในราคา 420 – 520 บาทขึ้นอยูู่กับตัวเลือก และคุณยังหาข้อมูลเพิ่มเติมได้ที่นั้น

กรรมการผู้จัดการของโรงเรียนเกี่ยวกับหุ่นยนต์ในจ.เชียงใหม่, ชนะเลิศการแข่งขันหุ่นยนต์ต่างๆ ทั้งในและต่างประเทศ ได้แก่ Robocon และ Makerthon

