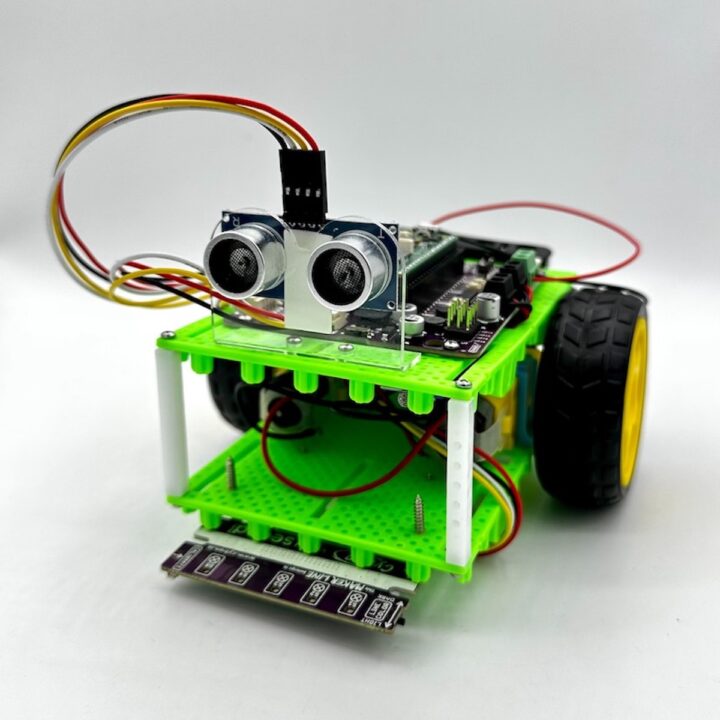
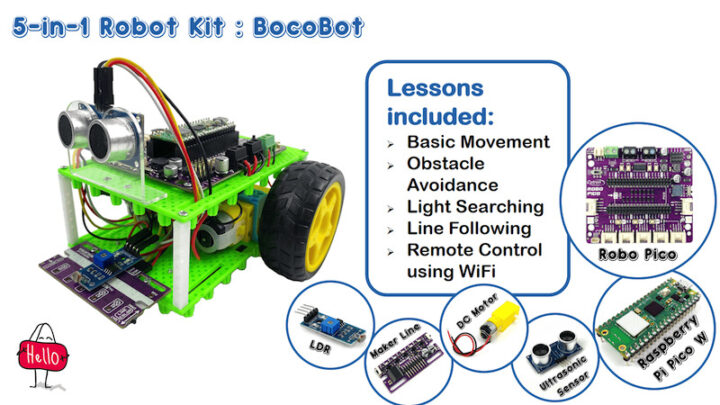
ชุดหุ่นยนต์ BocoBot เป็นชุดหุ่นยนต์เพื่อการเรียนรู้ที่ขับเคลื่อนด้วยบอร์ดขยาย Robo Pico กับ Raspberry Pi Pico W มีวิดีโอในการติดตั้งและโค้ดตัวอย่าง 5 ภารกิจ ไม่ว่าจะเป็นการเคลื่อนที่ไปทิศทางต่างๆ การเคลื่อนที่หลบหลีกสิ่งกีดขวางด้วยเซนเซอร์ Ultrasonic การเคลื่อนที่แบบตรวจจับแสง การเดินตามเส้น และการเคลื่อนที่ด้วย Web Browse ผ่านการเชื่อมต่อแบบ WiFi และยังสามารถเพิ่มเติมโมดูลต่างๆเข้าไปได้อีกและสร้างสรรค์ผลงานได้ตามจินตนาการอีกด้วย
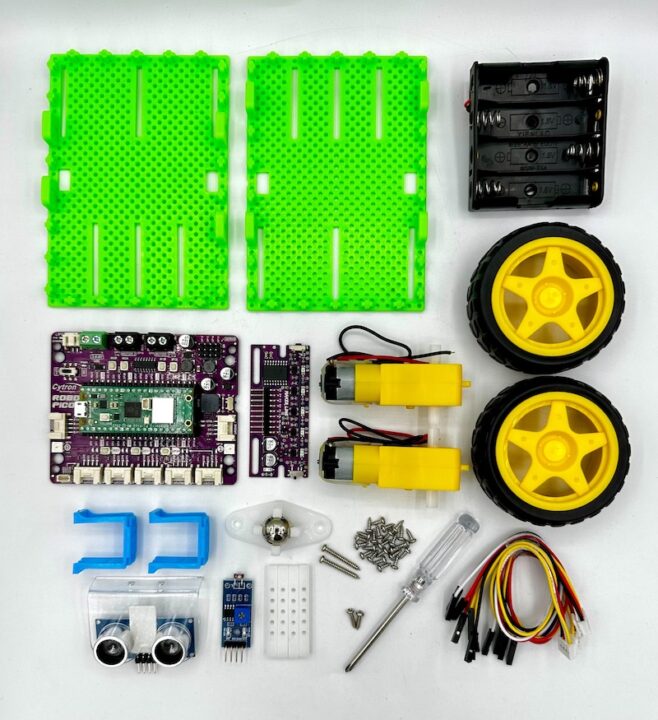
อุปกรณ์ในชุด BocoBot
- บอร์ดขยาย Robo Pico จำนวน 1 ชิ้น
- แผงเซนเซอร์ Maker Line จำนวน 1 ชิ้น
- แผ่นฐานพลาสติก จำนวน 2 แผ่น
- TT มอเตอร์ 6 โวลต์ จำนวน 2 ชิ้น
- ล้อหุ่นยนต์ จำนวน 2 ล้อ
- ตัวยึดมอเตอร์ จำนวน 2 ชิ้น
- เสารองพลาสติก จำนวน 4 ชิ้น
- ล้อประคอง จำนวน 1 ชิ้น
- เซนเซอร์อ่านค่าแสง จำนวน 1 ชิ้น
- เซนเซอร์อัลตร้าโซนิกส์ HC-SR04 จำนวน 1 ชิ้น
- สายแปลงสัญญาณ Grove เป็น Pin ตัวเมีย จำนวน 3 ชุด
- ชุดน๊อตสกรู จำนวน 1 ชุด
- ไขควงแฉกจำนวน 1 ชุด
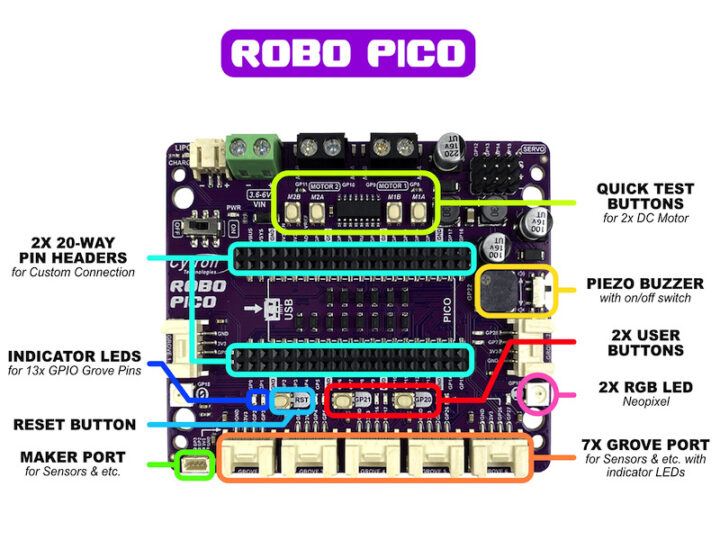
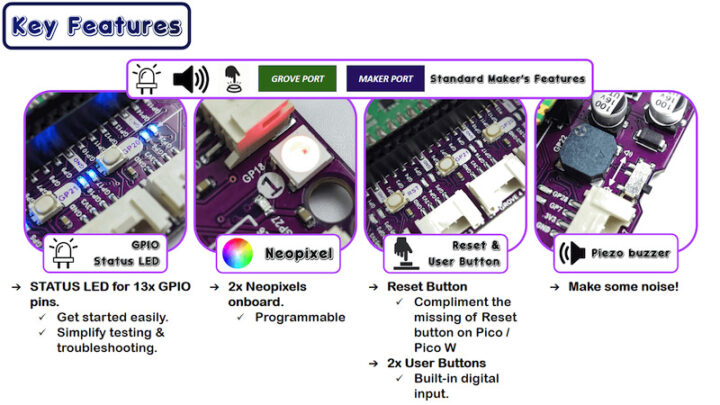
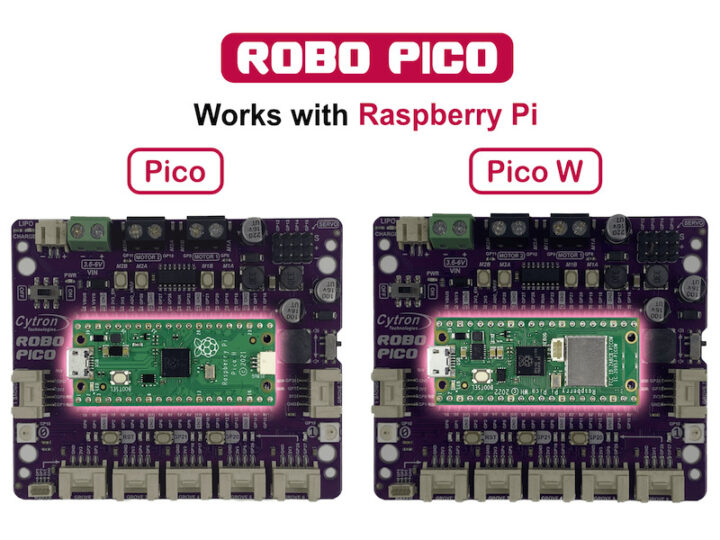
บอร์ดขยาย Robo Pico ออกแบบมาเพื่อใช้งานกับบอร์ด Raspberry Pi Pico และ Pico W มาพร้อมด้วยการเชื่อมต่อได้หลากหลาย สามารถเชื่อมต่อมอเตอร์ไฟฟ้ากระแสตรงได้ 2 ช่องพร้อมทั้งมีปุ่มทดสอบการทำงานมอเตอร์ได้อีกด้วย มีช่องต่อเซอร์โวมอเตอร์ได้ 4 ช่อง มีลำโพงเสียงแบบ Piezo พร้อมด้วยสวิตซ์เปิด-ปิดเสียงเมื่อไม่ต้องการใช้งาน มีปุ่มกดสวิตซ์รับสัญญาณ Input จำนวน 2 ปุ่ม มีไฟ Led แสดงสถานะพอร์ต GPIO ทั้ง 13 พอร์ต มีไฟ LED แบบ RGB จำนวน 2 ดวง มีช่องต่อสัญญาณแบบ Grove 4 pins จำนวน 7 ช่อง ซึ่งสามารถเชื่อมต่อขยายบอร์ด Raspberry Pi Pico และ Pico W ได้อย่างครบเครื่องเลยทีเดียว
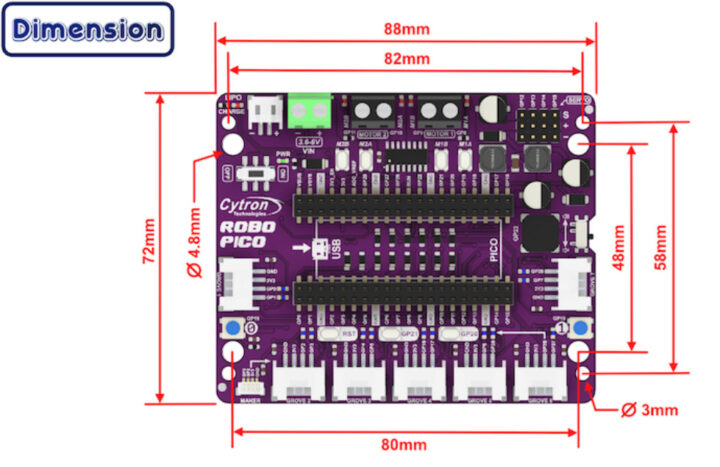
บอร์ดขยาย ROBO PICO มีขนาด 88 มม x 72 มม มีรูยึดมี 2 ขนาดเพื่อความสะดวกในการใช้งาน คือ
- ขนาดรู 3 มม ระยะของรู 82 มม x 58 มม
- ขนาดรู 4.8 มม ระยะของรู 80 มม x 48 มม
ส่วนประกอบและจุดเชื่อมต่อบอร์ดขยาย ROBO PICO
- มีไฟแสดงสถานะ GPIO 13 pins
- มีไฟ LED แบบ RGB 2 ดวง
- มีปุ่มกด Reset และ ปุ่มกดรับค่า Input 2 ปุ่ม
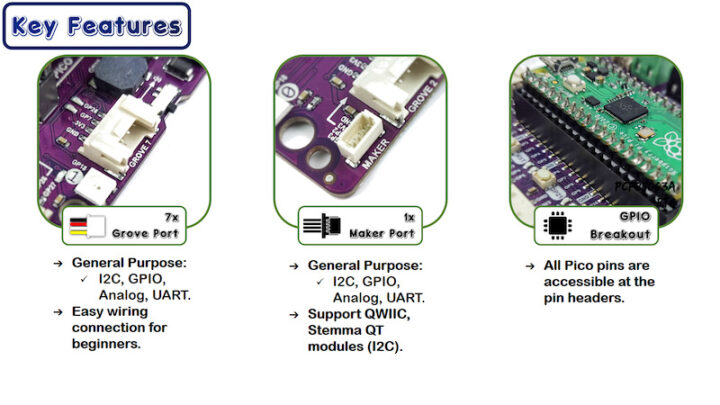
- มีพอร์ตรับสัญญาณภายนอกเป็น Connector แบบ Grove 4 pins จำนวน 7 พอร์ต รับสัญญาณได้แบบ I2C, GPIO, UART, ANALOG
- มีพอร์ตรับสัญญาณภายนอกเป็น Connector แบบ Maker Port 4 pins จำนวน 1 พอร์ต รองรับ QWIIC StemmaQT I2C
- มี Pin ขยายขา แบบ Pin headers รองรับ Raspberry Pi Pico ทุกเวอร์ชั่น
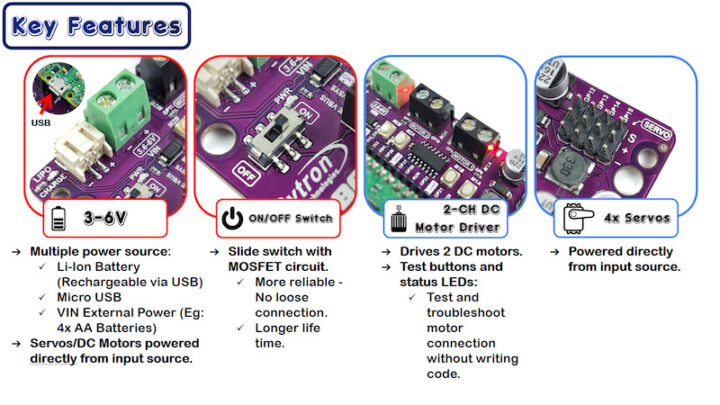
- รับไฟได้ 3-6 โวลต์ สามารถใช้แบตเตอรี่แบบ Li-Po 1 Cell ชาร์จไฟได้ด้วย USB หรือไฟจากภายนอกได้เช่น ถ่าน AA,AAA จำนวน 4 ก้อน
- มีสวิตซ์เปิด-ปิด
- สามารถขับมอเตอร์ไฟฟ้ากระแสตรงได้ 2 ช่อง พร้อมไฟแสดงสถานะการสั่งงาน
- สามารถขับเซอร์โวมอเตอร์ได้ 4 ช่อง
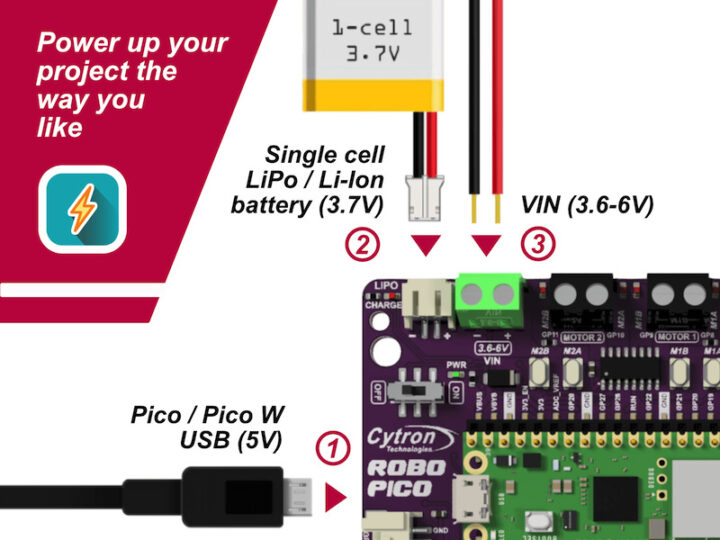
การรับไฟของบอร์ด Robo Pico
- รับไฟจาก USB 5 โวลต์ สามารถเสียบได้ที่ Pico/Pico W
- รับไฟจากแบตเตอรี่แบบ Li-Po 1 Cell 3.7 โวลต์
- รับไฟจากภายนอกได้เช่น ถ่าน AA, AAA (1.5 โวลต์) 4 ก้อน (6 โวลต์)
Robo Pico ใช้งานร่วมกับบอร์ด Raspberry Pi Pico / Pico W ได้ทั้ง 2 เวอร์ชั่น และยังสามารถใช้ไฟเลี้ยงจะพอร์ต USB ของ Raspberry Pi Pico ในการทำงานได้อีกด้วย
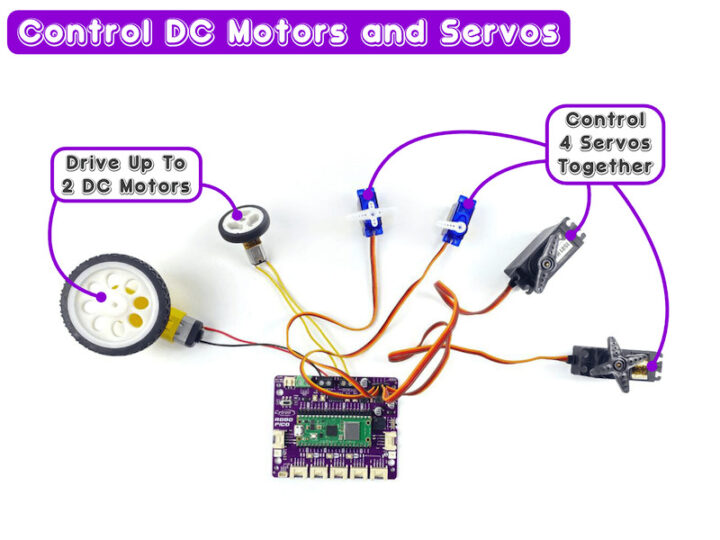
การเชื่อมต่อมอเตอร์ไฟฟ้ากระแสตรงและเซอร์โวมอเตอร์
- สามารถขับมอเตอร์ไฟฟ้ากระแสตรงได้ 2 ช่อง พร้อมไฟแสดงสถานะการสั่งงานหมุนทั้งไป-กลับ
- สามารถขับเซอร์โวมอเตอร์ 6 โวลต์ ได้ 4 ช่องสัญญาณพร้อมกัน
วิดีโอการประกอบหุ่นยนต์ BocoBot
การติดตั้งโปรแกรม Thonny IDE
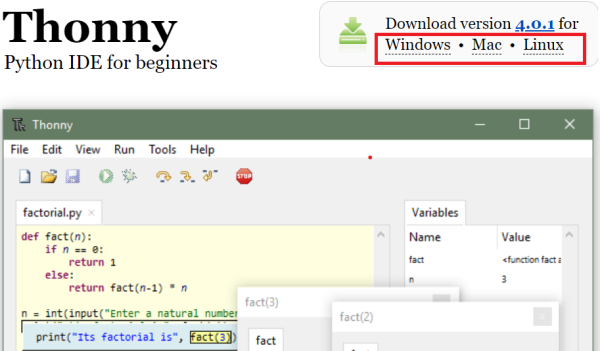
โดยการทดสอบกับบอร์ด Raspberry Pi Pico จะใช้ Thonny เป็น Python IDE ระดับสำหรับเริ่มต้น ซึ่งออกแบบมาเหมาะสำหรับการเรียนรู้และการสอนการเขียนโปรแกรม พัฒนาโดย Tartu University ในเอสโตเนีย สามารถโหลดและติดตั้งโปรแกรมได้ที่ Link นี้
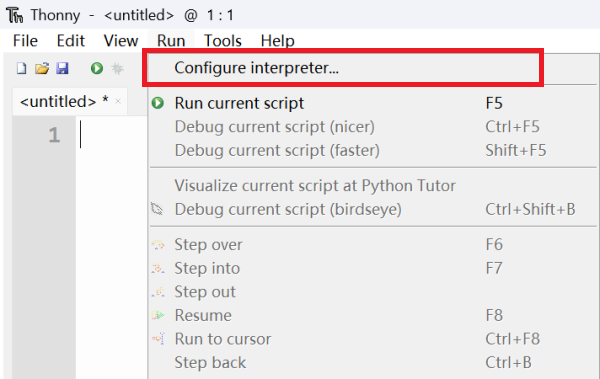
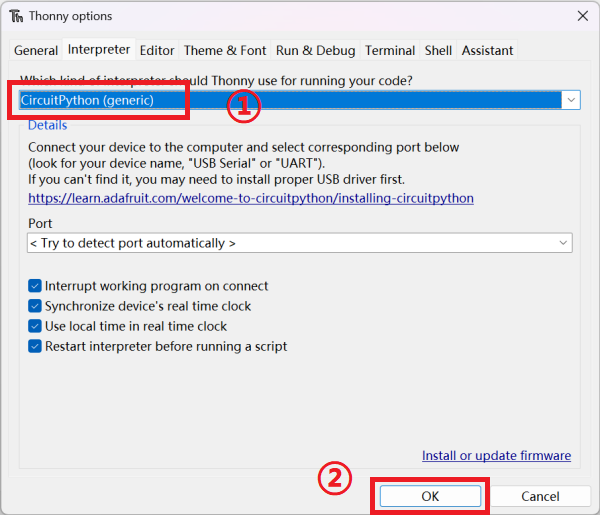
เปิด Thonny ขึ้นมา จากนั้นคลิกเมนู “Run” เลือก “Configure interperter”
ในตัวเลือก “Interperter”
- คลิกเลือก “CircuitPython(generic)”
- คลิก “OK” จากนั้นก็ทำการตั้งค่าเสร็จสิ้น
การติดตั้งเฟิร์มแวร์ Circuit Python
Raspberry Pi Pico รองรับการเขียนภาษา C, C++, MicroPython, CircuitPython
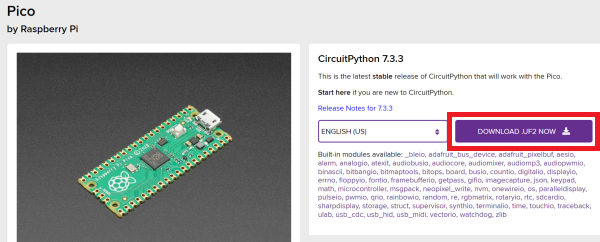
CircuitPython เป็นภาษาโปรแกรมที่ออกแบบมาเพื่อลดความซับซ้อนของการเรียนรู้ โดย CircuitPython เป็นวิธีที่ง่ายที่สุดในการเขียนโปรแกรมไมโครคอนโทรลเลอร์ สามารถดาวน์โหลด firmware .UF2 ได้ที่ Link นี้
การติดตั้งไลบรารี่
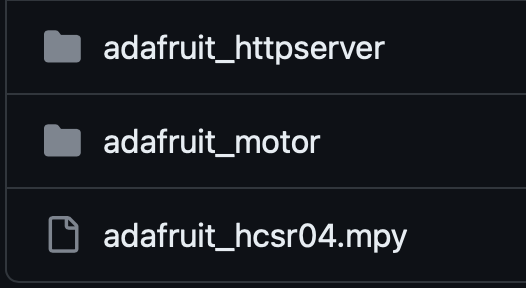
ในการเขียนโปรแกรมควบคุมอุปกรณ์โมดูลรวมถึงเซนเซอร์ต่างๆ ด้วย CircuitPython จะต้องใช้ไฟล์ไลบรารี่ สามารถดาวน์โหลดไฟล์ไลบรารี่ ของหุ่นยนต์ BocoBot ได้โดย Link นี้และทำการคัดลอกไฟล์ไปไว้ในไดเร็กทอรี “lib” ของไดร์ “CIRCUITPY”
วิดีโอการติดตั้งโปรแกรมและไลบรารี่
การเขียนโปรแกรมควบคุมมอเตอร์ให้หุ่นยนต์เคลื่อนที่
การทดสอบสั่งการมอเตอร์ทั้ง 2 ล้อ การเชื่อมต่อของบอร์ดขยาย Robo Pico มอเตอร์ซ้ายจะใช้ทั้งหมด 2 พอร์ต คือ GPIO8, GPIO9 มอเตอร์ขวาจะใช้ทั้งหมด 2 พอร์ต คือ GPIO10, GPIO11 โดยใช้ความถี่ PWM ทั้ง 2 มอเตอร์ ในการเคลื่อนที่เราสร้างฟังก์ชั่นให้ง่ายขึ้นโดยใช้คำสั่ง Robot_Movement(speedL, speedR)
|
1 2 3 4 5 6 7 8 9 10 11 12 13 14 15 16 17 18 19 20 21 22 23 24 25 26 27 28 29 30 31 32 33 34 35 36 37 38 |
import time import board import digitalio import pwmio from adafruit_motor import motor # Left Motor PWM_M1A = board.GP8 PWM_M1B = board.GP9 # Right Motor PWM_M2A = board.GP10 PWM_M2B = board.GP11 # DC motor setup # DC Motors generate electrical noise when running that can reset the microcontroller in extreme # cases. A capacitor can be used to help prevent this. pwm_1a = pwmio.PWMOut(PWM_M1A, frequency=10000) pwm_1b = pwmio.PWMOut(PWM_M1B, frequency=10000) motorL = motor.DCMotor(pwm_1a, pwm_1b) pwm_2a = pwmio.PWMOut(PWM_M2A, frequency=10000) pwm_2b = pwmio.PWMOut(PWM_M2B, frequency=10000) motorR = motor.DCMotor(pwm_2a, pwm_2b) def Robot_Movement(speedL, speedR): motorL.throttle = speedL motorR.throttle = speedR while True: Robot_Movement(0, 0) #Stop time.sleep(2) Robot_Movement(0.8, 0.8) #Forward time.sleep(3) Robot_Movement(-0.8, -0.8) #Backward time.sleep(3) Robot_Movement(0.1, 0.8) #Turn Left time.sleep(3) Robot_Movement(0.8, 0.1) #Turn Right time.sleep(3) |
การเขียนโปรแกรมหุ่นยนต์หลบหลีกสิ่งกีดขวาง
การทดสอบหุ่นยนต์หลบหลีกสิ่งกีดขวาง ใช้เซนเซอร์ Ultrasonic HCSR04 ในการตรวจจับวัตถุ โดยการเชื่อมต่อกับบอร์ดขยายใช้ Trigger Pin = GPIO16 , Echo Pin = GPIO17 โดยเซนเซอร์จะส่งค่าเป็น เซนติเมตร ในการทดสอบเขียนโปรแกรมสร้างเงื่อนไขว่าถ้าเซนเซอร์จับวัตถุได้น้อยกว่า 10 เซนติเมตรให้หุ่นยนต์เลี้ยวซ้ายเป็นเวลา 1 วินาที หากไม่เจอสิ่งกีดขวางให้หุ่นยนต์เดินหน้าไปเรื่อยๆ วนซ้ำไปเรื่อยๆ
|
1 2 3 4 5 6 7 8 9 10 11 12 13 14 15 16 17 18 19 20 21 22 23 24 25 26 27 28 29 30 31 32 33 34 35 36 37 38 39 40 41 42 43 |
import time import board import digitalio import pwmio from adafruit_motor import motor import adafruit_hcsr04 sonar = adafruit_hcsr04.HCSR04(trigger_pin=board.GP16, echo_pin=board.GP17) # Left Motor PWM_M1A = board.GP8 PWM_M1B = board.GP9 # Right Motor PWM_M2A = board.GP10 PWM_M2B = board.GP11 # DC motor setup # DC Motors generate electrical noise when running that can reset the microcontroller in extreme # cases. A capacitor can be used to help prevent this. pwm_1a = pwmio.PWMOut(PWM_M1A, frequency=10000) pwm_1b = pwmio.PWMOut(PWM_M1B, frequency=10000) motorL = motor.DCMotor(pwm_1a, pwm_1b) pwm_2a = pwmio.PWMOut(PWM_M2A, frequency=10000) pwm_2b = pwmio.PWMOut(PWM_M2B, frequency=10000) motorR = motor.DCMotor(pwm_2a, pwm_2b) def Robot_Movement(sL, sR): motorL.throttle = sL motorR.throttle = sR def Read_Ultrasonic(): time.sleep(0.1) return sonar.distance while True: Distance = Read_Ultrasonic() print(Distance) if (Distance < 10): Robot_Movement(0.1, 0.5) #Turn Left print("Turn Left") time.sleep(1) else: Robot_Movement(0.5, 0.54) #Forward |
การเขียนโปรแกรมหุ่นยนต์วิ่งตามแสงไฟ
การทดสอบหุ่นยนต์วิ่งตามแสงไฟ ด้วยเซนเซอร์อ่านค่าแสง (Light Sensor Module) การอ่านค่าแสงแบบ Analog โดยการเชื่อมต่อกับบอร์ดขยายใช้พอร์ต 3v3 = Vcc, GND , A0 = GPIO27 โดยเซนเซอร์จะส่งค่าอยู่ระหว่าง 0-30000 ในการทดสอบเขียนโปรแกรมสร้างเงื่อนไขว่าถ้าเซนเซอร์จับค่าความสว่างได้น้อยกว่า 15000 หุ่นยนต์จะเดินหน้า หากเซนเซอร์ไม่เจอความสว่างหุ่นยนต์จะเลี้ยวซ้ายไปเรื่อยๆ
|
1 2 3 4 5 6 7 8 9 10 11 12 13 14 15 16 17 18 19 20 21 22 23 24 25 26 27 28 29 30 31 32 33 34 35 36 37 38 39 40 |
import time import board import analogio import digitalio import pwmio from adafruit_motor import motor # Left Motor PWM_M1A = board.GP8 PWM_M1B = board.GP9 # Right Motor PWM_M2A = board.GP10 PWM_M2B = board.GP11 # DC motor setup # DC Motors generate electrical noise when running that can reset the microcontroller in extreme # cases. A capacitor can be used to help prevent this. pwm_1a = pwmio.PWMOut(PWM_M1A, frequency=10000) pwm_1b = pwmio.PWMOut(PWM_M1B, frequency=10000) motorL = motor.DCMotor(pwm_1a, pwm_1b) pwm_2a = pwmio.PWMOut(PWM_M2A, frequency=10000) pwm_2b = pwmio.PWMOut(PWM_M2B, frequency=10000) motorR = motor.DCMotor(pwm_2a, pwm_2b) ldr = analogio.AnalogIn(board.GP27) def Robot_Movement(sL, sR): motorL.throttle = sL motorR.throttle = sR while True: raw = ldr.value print("raw = {:5d}".format(raw)) time.sleep(0.1) if (raw < 15000): # << Please changed HERE Robot_Movement(0.5, 0.53) # Forward print("Move Forward") else: Robot_Movement(0.1, 0.33) # Turn Left print("Turn Left") |
การเขียนโปรแกรมหุ่นยนต์วิ่งตามเส้น
การทดสอบหุ่นยนต์วิ่งตามเส้น ด้วยเซนเซอร์จับเส้นแบบ 5 เซนเซอร์ (Maker Line) การอ่านค่าแสงแบบ Analog โดยการเชื่อมต่อกับบอร์ดขยายใช้พอร์ต 3v3 = Vcc, GND , A0 = GPIO26 โดยเซนเซอร์จะส่งค่าแรงดันอยู่ระหว่าง 0V – 3.3V ในการทดสอบเขียนโปรแกรมสร้างเงื่อนไขว่าถ้าเซนเซอร์ตรวจจับเส้นได้ในกรณีต่างๆให้หุ่นยนต์เคลื่อนที่ไปตามเส้นด้วยความเร็วที่แตกต่างกัน
|
1 2 3 4 5 6 7 8 9 10 11 12 13 14 15 16 17 18 19 20 21 22 23 24 25 26 27 28 29 30 31 32 33 34 35 36 37 38 39 40 41 42 43 44 45 46 47 48 49 50 51 52 53 54 |
import time import board import analogio import digitalio import pwmio from adafruit_motor import motor # Left Motor PWM_M1A = board.GP8 PWM_M1B = board.GP9 # Right Motor PWM_M2A = board.GP10 PWM_M2B = board.GP11 # DC motor setup # DC Motors generate electrical noise when running that can reset the microcontroller in extreme # cases. A capacitor can be used to help prevent this. pwm_1a = pwmio.PWMOut(PWM_M1A, frequency=10000) pwm_1b = pwmio.PWMOut(PWM_M1B, frequency=10000) motorL = motor.DCMotor(pwm_1a, pwm_1b) pwm_2a = pwmio.PWMOut(PWM_M2A, frequency=10000) pwm_2b = pwmio.PWMOut(PWM_M2B, frequency=10000) motorR = motor.DCMotor(pwm_2a, pwm_2b) # Sensors SA = analogio.AnalogIn(board.GP26) def Robot_Movement(sL, sR): motorL.throttle = sL motorR.throttle = sR while True: an = (SA.value * 3.3) / 65536 print(an) if (an>1.4 and an<1.5): #1.4 - 1.7v print("move forward") Robot_Movement(0.5, 0.53) elif (an>1.8 and an<2.2): # 1.7 - 2.2v Robot_Movement(0.5, 0.3) elif (an>0.8 and an<1.4): # 0.8 - 1.4v Robot_Movement(0.3, 0.53) elif (an>2.2 and an<2.85): # 2.2 - 2.85v Robot_Movement(0.6, 0.2) elif (an>0.4 and an<0.8): # 0.6 - 0.8v Robot_Movement(0.2, 0.63) elif (an>2.85 and an<3.0): # 2.85 - 3.0v Robot_Movement(0.6, 0) elif (an>0.3 and an<0.4): # 0.3 - 0.4v Robot_Movement(0, 0.64) elif (an<0.3 or an>3): # <0.3v or >3V #Robot_Movement(0, 0) continue |
การเขียนโปรแกรมควบคุมหุ่นยนต์ผ่านการสื่อสารแบบ WiFi
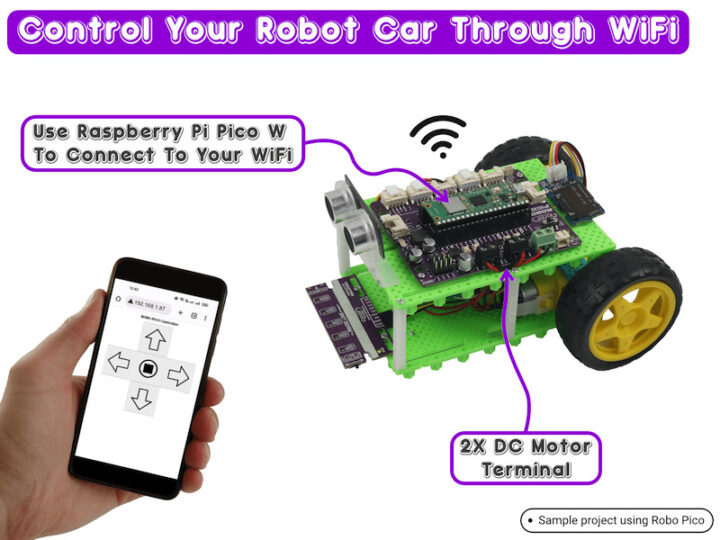
การทดสอบหุ่นยนต์ควบคุมด้วย Web Browser เป็นการสื่อสารผ่าน WiFi โดยใช้บอร์ด Raspberry Pi Pico ร่วมกับบอร์ดขยาย Robo Pico มีการเขียนโปรแกรมปุ่มคำสั่งด้วยภาษา HTML ลงไปในโค้ด และมีการเชื่อมต่อผ่าน IP Adrress ของ Pi Pico เชื่อมต่อกับ SmartPhone หรือ คอมพิวเตอร์ผ่าน Web Browser ได้ โดยโค้ดตัวอย่างจะเป็นการใช้คำสั่ง เดินหน้า ถอย หลัง เลี้ยวซ้าย เลี้ยวขวา และ หยุดหุ่นยนต์ ซึ่งเป็นคำสั่งพื้นฐานในการเคลื่อนที่
|
1 2 3 4 5 6 7 8 9 10 11 12 13 14 15 16 17 18 19 20 21 22 23 24 25 26 27 28 29 30 31 32 33 34 35 36 37 38 39 40 41 42 43 44 45 46 47 48 49 50 51 52 53 54 55 56 57 58 59 60 61 62 63 64 65 66 67 68 69 70 71 72 73 74 75 76 77 78 79 80 81 82 83 84 85 86 87 88 89 90 91 92 93 94 95 96 97 98 99 100 101 102 103 104 105 106 107 108 109 110 111 112 113 114 115 116 117 118 119 120 121 122 123 124 125 126 127 128 129 130 131 132 133 134 135 136 137 138 139 140 141 142 143 144 145 146 147 148 149 150 151 152 153 154 155 156 157 158 159 160 161 162 163 164 165 166 167 168 169 170 171 172 173 174 175 176 177 178 179 180 181 182 183 184 185 186 187 188 189 190 191 192 193 194 195 196 197 198 199 200 201 202 203 204 205 206 207 208 209 210 211 212 213 214 215 216 217 |
import os import time import ipaddress import wifi import socketpool import board import microcontroller import digitalio import pwmio from adafruit_motor import motor from digitalio import DigitalInOut, Direction from adafruit_httpserver.server import HTTPServer from adafruit_httpserver.request import HTTPRequest from adafruit_httpserver.response import HTTPResponse from adafruit_httpserver.methods import HTTPMethod from adafruit_httpserver.mime_type import MIMEType # Left Motor PWM_M1A = board.GP8 PWM_M1B = board.GP9 # Right Motor PWM_M2A = board.GP10 PWM_M2B = board.GP11 # DC motor setup # DC Motors generate electrical noise when running that can reset the microcontroller in extreme # cases. A capacitor can be used to help prevent this. pwm_1a = pwmio.PWMOut(PWM_M1A, frequency=10000) pwm_1b = pwmio.PWMOut(PWM_M1B, frequency=10000) motorL = motor.DCMotor(pwm_1a, pwm_1b) pwm_2a = pwmio.PWMOut(PWM_M2A, frequency=10000) pwm_2b = pwmio.PWMOut(PWM_M2B, frequency=10000) motorR = motor.DCMotor(pwm_2a, pwm_2b) def Robot_Movement(sL, sR): motorL.throttle = sL motorR.throttle = sR # connect to network print() print("Connecting to WiFi") # set static IP address # ipv4 = ipaddress.IPv4Address("192.168.1.42") # netmask = ipaddress.IPv4Address("255.255.255.0") # gateway = ipaddress.IPv4Address("192.168.1.1") # wifi.radio.set_ipv4_address(ipv4=ipv4,netmask=netmask,gateway=gateway) # connect to your SSID wifi.radio.connect(os.getenv('CIRCUITPY_WIFI_SSID'), os.getenv('CIRCUITPY_WIFI_PASSWORD')) print("Connected to WiFi") pool = socketpool.SocketPool(wifi.radio) server = HTTPServer(pool, "/static") def move_forward(): print ("Forward") Robot_Movement(0.5, 0.53) def move_backward(): print ("Backward") Robot_Movement(-0.5, -0.53) def move_left(): print ("Left") Robot_Movement(0, 0.5) def move_right(): print ("Right") Robot_Movement(0.5, 0) def move_stop(): print ("Stop") Robot_Movement(0, 0) # the HTML script # setup as an f string # this way, can insert string variables from code.py directly # of note, use {{ and }} if something from html *actually* needs to be in brackets # i.e. CSS style formatting def webpage(): html = f""" <!DOCTYPE html> <html> <head> <meta http-equiv="Content-type" content="text/html;charset=utf-8"> <meta name="viewport" content="width=device-width, initial-scale=1"> <script> function buttonDown(button) {{ // Send a POST request to tell the Pico that the button was pressed var xhttp = new XMLHttpRequest(); xhttp.open("POST", "/", true); xhttp.setRequestHeader("Content-type", "application/x-www-form-urlencoded"); xhttp.send(button + "=true"); }} function buttonUp() {{ // Send a POST request to tell the Pico that the button was released (stop) var xhttp = new XMLHttpRequest(); xhttp.open("POST", "/", true); xhttp.setRequestHeader("Content-type", "application/x-www-form-urlencoded"); xhttp.send("stop=true"); }} </script> <style> h1 {{ text-align: center; }} body {{ display: flex; flex-direction: column; align-items: center; justify-content: center; height: 80vh; margin: 0; }} .controls {{ display: grid; grid-template-columns: repeat(3, 1fr); gap: 10px; }} .button {{ font-size: 90px; display: flex; align-items: center; justify-content: center; //border: 2px solid black; //border-radius: 10px; background: white; padding: 10px; user-select: none; width: 80px; height: 80px; }} </style> </head> <body> <h1>Robo Pico Wifi Control Car</h1> <center><b> <div class="controls"> <div></div> <div class="button" id="forward" ontouchstart="buttonDown(this.id)" ontouchend="buttonUp()" onmousedown="buttonDown(this.id)" onmouseup="buttonUp()">⬆️</div> <div></div> <div class="button" id="left" ontouchstart="buttonDown(this.id)" ontouchend="buttonUp()" onmousedown="buttonDown(this.id)" onmouseup="buttonUp()">⬅️</div> <div></div> <div class="button" id="right" ontouchstart="buttonDown(this.id)" ontouchend="buttonUp()" onmousedown="buttonDown(this.id)" onmouseup="buttonUp()">➡️</div> <div></div> <div class="button" id="backward" ontouchstart="buttonDown(this.id)" ontouchend="buttonUp()" onmousedown="buttonDown(this.id)" onmouseup="buttonUp()">⬇️</div> <div></div> </div> </body></html> """ return html # route default static IP @server.route("/") def base(request: HTTPRequest): # pylint: disable=unused-argument # serve the HTML f string # with content type text/html with HTTPResponse(request, content_type=MIMEType.TYPE_HTML) as response: response.send(f"{webpage()}") # if a button is pressed on the site @server.route("/", method=HTTPMethod.POST) def buttonpress(request: HTTPRequest): # get the raw text raw_text = request.raw_request.decode("utf8") #print(raw_text) # if the Forward button was pressed if "forward" in raw_text: # move car forward move_forward() if "backward" in raw_text: # move car forward move_backward() if "right" in raw_text: # move car forward move_right() if "left" in raw_text: # move car forward move_left() if "stop" in raw_text: # move car forward move_stop() # reload site with HTTPResponse(request, content_type=MIMEType.TYPE_HTML) as response: response.send(f"{webpage()}") print("starting server..") # startup the server try: server.start(str(wifi.radio.ipv4_address)) print("Listening on http://%s" % wifi.radio.ipv4_address) # if the server fails to begin, restart the pico w except OSError: time.sleep(5) print("restarting..") microcontroller.reset() while True: try: # poll the server for incoming/outgoing requests server.poll() except Exception as e: print(e) continue |
วิดีโอการทดสอบ
สรุป
BocoBot เป็นชุดหุ่นยนต์เพื่อการเรียนรู้ที่ขับเคลื่อนด้วยบอร์ดขยาย Robo Pico กับ Raspberry Pi Pico W สามารถสร้างโปรเจคพื้นฐานได้ถึง 5 ภารกิจ ไม่ว่าจะเป็นการเคลื่อนที่ไปทิศทางต่างๆ การเคลื่อนที่หลบหลีกสิ่งกีดขวางด้วยเซนเซอร์ Ultrasonic การเคลื่อนที่แบบตรวจจับแสง การเดินตามเส้น และการเคลื่อนที่ด้วย Web Browser ด้วยการเชื่อมต่อแบบ WiFi และยังสามารถเพิ่มเติมโมดูลต่างๆเข้าไปได้อีกและสร้างสรรค์ผลงานได้ตามจินตนาการ ด้วยบอร์ดขยาย Robo Pico ออกแบบมาเพื่อใช้งานกับบอร์ด Raspberry Pi Pico และ Pico W มาพร้อมด้วยการเชื่อมต่อได้หลากหลาย สามารถเชื่อมต่อมอเตอร์ไฟฟ้ากระแสตรงได้ 2 ช่องพร้อมทั้งมีปุ่มทดสอบการทำงานมอเตอร์ได้อีกด้วย มีช่องต่อเซอร์โวมอเตอร์ได้ 4 ช่อง มีลำโพงเสียงแบบ Piezo พร้อมด้วยสวิตซ์เปิด-ปิดเสียงเมื่อไม่ต้องการใช้งาน มีปุ่มกดสวิตซ์รับสัญญาณ Input จำนวน 2 ปุ่ม มีไฟ Led แสดงสถานะพอร์ต GPIO ทั้ง 13 พอร์ต มีไฟ LED แบบ RGB จำนวน 2 ดวง มีช่องต่อสัญญาณแบบ Grove 4 pins จำนวน 7 ช่อง ซึ่งสามารถเชื่อมต่อขยายบอร์ด Raspberry Pi Pico และ Pico W ได้อย่างครบเครื่องเลยทีเดียว เหมาะผู้ที่สนใจการเรียนรู้ที่จะสร้างหุ่นยนต์เริ่มต้นเป็นของตนเอง อีกทั้งยังสามารถนำไปใช้ในการเรียนการสอนในห้องเรียนได้อีกด้วย
ผมต้องขอขอบคุณบริษัท Cytron ที่ส่งชุดหุ่นยนต์ BocoBot มาทดสอบ ตอนนี้ชุดหุ่นยนต์ยังไม่มีขายในประเทศไทยสามารถหาซื้อบอร์ด Robo Pico ในราคาเริ่มต้นที่ 499 บาท, Robo Pico + Raspberry Pi Pico ราคา 753 บาท, Robo Pico + Raspberry Pi Pico W ราคา 863 บาท ที่ร้านค้าออนไลน์ Cytron Thailand

กรรมการผู้จัดการของโรงเรียนเกี่ยวกับหุ่นยนต์ในจ.เชียงใหม่, ชนะเลิศการแข่งขันหุ่นยนต์ต่างๆ ทั้งในและต่างประเทศ ได้แก่ Robocon และ Makerthon

